Wednesday, November 13, 2013

Scrap Friends Candy Giveaway

Right now Scrap Friends are having a Candy Giveaway! Head on over to their blog  and you'll find the details on how to enter. Here is a pic of the Candy Giveaway:

The competition closes 15th December and is open to everyone!

If you have never been over there before be sure too, they have some cool challenges, an awesome design team and above excellent customer service (I'm in no way affiliated, just giving my honest opinion)
You can get to their site via the Scrap Friends button on the right hand side of this page or this link:

Until next time, I hope you are staying crafty
Deb

Tuesday, November 12, 2013

An Update

I just wanted to provide a quick update today. Life got a little crazy here the last couple of weeks so I didn't finish my last Silhouette project before Halloween (it's a Halloween box card which I still may do)

So I'm currently working on my next project which is a requested shape from the SOS. The request is from Katy and you can find her at http://kthames.blogspot.com.au . She has several free Silhouette Studio files to download and use and they are pretty darn cool!

So here is the shape I'm working with at the moment;
I'm hoping to have the video tutorial up next week, so be sure to come back and check it out!
Don't forget to pick up your free shape at the SOS!
Until next time, I hope you are staying crafty!
Deb
P.S Don't forget you can Request A Shape from the SOS for me to make a project. Just click on the Request A Shape at the top of the page!


Monday, October 21, 2013

Halloween Step Card Using the Silhouette Cameo

It's taken me a while to really get back into crafting after having my fourth baby and my craft room has moved twice into two different rooms in the house.
So I'm excited to share this Halloween Step Card I designed in Silhouette Studio and cut with the Cameo.


Here is the video of how I put it together:


Now onto all the info:

The shapes I used:
A2 Lori Whitlock Scalloped Centre Step Card - Design ID: #42687 (Lori Whitlock)
Raven Vintage Jack-O-Lantern - Design ID: #48192 (Glitz Design)
Raven Banner - Design Id: #48184 (Glitz Design)
Glitz Paper Raven Triangles (patterned paper) - Design ID: #48195 (Glitz Design)

Products I Used:
Tim Holtz Distress Ink in Black Soot
Ranger Glossy Accents
Foam adhesive
Bazzill Cardstock

If you are new to using Silhouette Studio and your Silhouette Machine you may find these links helpful:


Kerri Bradford Studio  (Awesome classes on learning about all about the Silhouette)

Doodling Debbie-You Tube (Shares tips and tricks about Silhouette Studio)

Silhouette Plus Forum (share your projects or ask other members for help)

Here are the links to the videos I mentioned in my video:


Lori Whitlock's Video Tutorial on Step Cards

Margaret Wilburn Video Tutorial Cropping a Background Away

Ok, thats it from me today!! Don't forget you can request a shape from the Silhouette Online Store, I'll try my best to make a project from it!

Hope you are all having a very crafty day!
Deb


Tuesday, October 15, 2013

Silhouette Stamping Material and Custom Stamps

G'day! I've been pretty slack posting on the blog, life is crazy hectic with a baby who doesn't like to sleep!
I'm here today to talk about Silhouettes' Stamping Material! I received it yesterday and got to playing straight away! 
I was highly impressed with the durability of the Stamp Material!
Here are a few cuts that I've already done.


I loved that it cut out the fine details and thin parts on the hello word. 
I highly recommend using a stamp press with your custom stamps. As the stamp material is not that thick, I found with the stamp press I got a better impression of the stamped images.

Heres a pic of the stamps all inked up. It is hard not to get ink on the surface of the stamp press because of how thin the material is  but don't worry it does not transfer onto the paper when you stamp.

and here is the result of the stamp images. The splotchy parts are my fault as I didn't apply even pressure on some parts.


I also have some pics of the stamped images and the different types of inks I used. It seems pigment and chalk ink work best!


I didn't think the Stampin' Up ink would work but tried it anyway and I think it gives a good distressed look if that is what you want to acheive!


And here is how I'm storing my custom stamps, in a clear CD case. (Yes I kept the negative of the hearts, could be useful as a mask)


I also got some Printable Cotton Canvas as well for the Silhouette and will let you know what I think of that after I use it.

That's it from me today. I hope you are having a very crafty day.


Deb


Shapes used to make stamps;
Hearts: Design ID #17176
Polaroid Photo Frame: Design ID #18096
Hello Hey Hi: Design ID #46981


Tuesday, March 5, 2013

Photo Editing with Apps

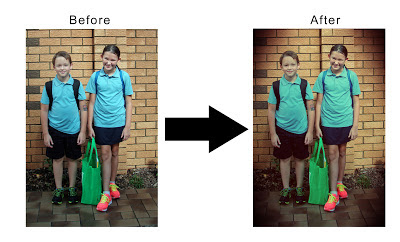
I love using my iPad (and iPhone) to make fun edits on my photos so I thought I'd share a quick tutorial on an edit I recently did. This one is super simple.
Apps needed:
This was the first day of school and it was a partially overcast day when I took the pic so I wanted to warm it up a bit.
Because I took the photo with my point and shoot camera I first dropped the pic into my Dropbox folder.
Photos added to Dropbox
 
I then opened my chosen photo in Pixlromatic.
 
I chose the effect Adrian
 
and then chose the overlay Redone
 
finally I saved it out to my camera roll
 
and thats it! Because I have Dropbox my pics automatically transfer back to my PC ready to be printed.
 
 
The possibilities are endless with the photo editing apps that are available!
Hope you are having a great day and happy editing!


Saturday, January 12, 2013

A New Year and Blog

I've decided to start a blog (and try to post to it as much as I can) just to have a place to ramble about my chaotic life and my love of crafts! 
This year I'm attempting Project Life for the second time (last year didn't work out so well!) and I even purchased the Seafoam Core Kit, joined The Studio Calico Day to Day Class and I'm also on the waiting list at the moment for The Studio Calico PL kit.

Happy pic of me when I got my core kit!

I found time to rearrange my craft room a bit to do PL and once I get it the way I like and working for me I will post some pics. I've decided this will be my way of memory preserving for now. My youngest just turned one, and I have 2 other kids who are 7 and 11 so I just don't do the traditional scrapbooking anymore. Not that I don't love it or miss it it's just the time factor. It takes me a few days to make a 12x12 layout (yes I'm that slow lol) and I want to get those memories written down and photos printed out instead of them sitting on the computer.
My approach to PL is not going to be a traditional weekly 2 page spread, this is why I feel I failed in 2012. Instead I'm doing it monthly. If I have a photo each day thats ok, if I don't have a photo or journalling for other days thats ok too, I feel this has taken the stress factor out of it and I'm super excited to be doing it.
I also have a freebie to share too! I designed a PL planner to help me keep track of my photos. As I journal daily in a diary I wanted something else to help me with the photo part of PL. So here are two styles I made, they are in PDF and free for all to enjoy and use!
Here are the links to download


So thats it from me for now, hopefully in my next post I'll have some pics of my PL to share. I also still have my other blog up, it's my blog of freebies I like to share, specifically SVG and silhouette files so check that out if you haven't already, there are also a few card making and scrapbooking tutorial videos there as well.
Until my next post, take care and happy crafting!


01 09 10